Friday, August 13, 2010

how to draw women's breasts

The main problems people seem to have with
drawing breasts are the shape and the
placement. A lot of artists (professionals as
well as ametuers) make them look like
balloons that have been taped onto the
subject's chest; this is hardly a natural look. If
you look through figure drawing books, you'll
see that they are more like halves of a sphere
or overturned teacups rather than balloons.

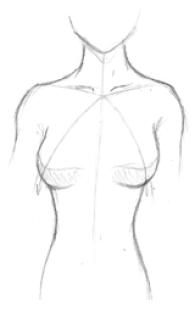
Now, note the position. Imagine a central guideline that runs down the center of
your subject's body, as shown at the left. The breasts are at 45 degree angles from
that center line, and are about halfway down the chest (shown by the red diagonal
guidelines). Be very careful not to draw them too close together or too far apart, or
too high on the chest; these are commonly made mistakes. As you will see in
examples below, this basic rule of the 45 degree placement will apply to pretty
much whatever pose you are using.


Here is another pose, showing the torso from a front view.
Note how the breasts are still located at 45 degree angles
from the center line of the body. Oh, also take note of the
shading. After looking at various examples, I find that
shading in this fashion (rather than just following the lower
curves as you would shade a sphere) makes them look
more natural.


Here is one last pose to go over the size and placement. It's
harder to see here, but the breasts are still at the 45 degree
angle from the center line (which isn't draw in this picture; sorry
about that ^_^;). Notice that the leftmost breast is drawn as a
half-sphere, not as a full sphere. If you want to exaggerate the
size, that's your choice, but I personally don't think its
necessary.

Drawing Dragonball Z Style Bodies


Thursday, August 12, 2010

Anime Style Heads


Anime Style Mouths and Noses

Here is your basic anime style nose and mouth. It consists of three
basic simple shapes: a wedge for the nose, a long, thin line for the
mouth, and a shorter line to define the lower lip (this lower line is not
always included, though). In frontal views like this, you can get away
with using very few lines to define the nose and mouth. The size and
shape of each feature varies with each character. Always make sure
the features line up; to help you line them up, draw vertical guidelines
as shown. In the second picture, the face is turned to the side, but the
features are still aligned along the curved guideline that represents the
center of the face.


Here is a selection of examples of
different styles of mouths and noses.
Several of these can be used for
either gender, do I didn't bother
separating them. ^_^ Notice that
with some styles, the mouth is
defined by only a thin, straight line,
while with other styles, the lips are
more well defined. Anime mouths
are not often very large, unless the
character is yelling or shouting, so
keep them relatively small. The
noses vary quite a lot, as well; some
are drawn as wedges, some are
defined solely with shading, and
some are detailed enough that you
can see the nostrils. Female
characters will tend to have smaller,
less defined noses, while male
characters will often have longer,
angular noses.

Here are some more examples of
noses and mouths, drawn at a
profile. Even though the proportions
and expressions change, they all
stick to the same basic shape as
mentioned above. When drawing
faces at this angle, be careful not to
make the noses really pointy and the
face too flat. Make sure the features
curve properly, or the face is not
going to turn out looking right.

Draw Female Eye Anime

Style # 1

Step 1:
Lets begin with the most basic and common of anime eyes, the large female type.
Start off by drawing a line that curves upwards, and is slightly thicker at the highest
point. This eye will be on the right side of the face, so make the left end of the curved
line higher than the right. The top of this particular eye (Lina Inverse's eye, (from
Slayers) actually ^.^) isn't a perfect curve; it is slightly angular. Some styles of eyes
are nearly perfectly curved on the top.

Step 2:
Next, you want to draw in the lower part of the eye. To help you place the lower half,
lightly draw diagonal lines pointing down, starting at the edges of the top part of the
eye. The steepness of the slope of these lines will determine how large and wide the
eye will be. If you look at the other tutorials on this page, you will see that the
steepness of these lines varies. Using these lines as a guide, draw the lower part of
the eye. It should slope down to the right a little, and should be thicker at the right
corner.